Showing posts with label progression of modification. Show all posts

Tuesday, June 24, 2014

Mods going as expected

Which is to say, I want to punch myself in the mouth repeatedly and throw the head into oncoming traffic.

I got the dremel bit all properly attached to my dremel and drilled some holes through the area of the eyes I'd already carved out so that I could tell when I was getting close and (hopefully) not destroy the eyelids.


I started in on making the eyewells deeper, and very quickly realized I had to go a lot further than I'd thought. This is one of those cases where my ignorance made me brave enough (or stupid enough) to attempt something that I never would have if I had any idea of what I was getting into.

I kept at it very timidly until I got to about this point and figured I should stop using the dremel and do it by hand. That ended up being a very slow process and I wasn't really getting anywhere, so I figured it couldn't hurt to do just a little bit more dremel work.

Spoiler alert: this is where things start to go horribly wrong.

I was going along slowly, being very careful not to just obliterate the eyelids and leave a 12mm hole in the head, when suddenly the lower lids just start moving. My immediate thought was that I'd gone too far and they were just going to fall out, but I quickly realized that the heat of the dremel was just making them soft. So I immediately stopped, held the eyelid in place for a few seconds while it cooled, and all seemed okay. So I moved on to the next eye and did the same thing. Only on that eye, I had come in at a slightly different angle, so instead of just making the eyelid soft, one of them actually cracked.


It's not actually terribly easy to see in the photo but the right eye has a crack near the tear duct. I have glued it together but I think I will also reinforce behind it with epoxy putty.

With the eyewells deep enough for proper eye opening, I figured I'd go ahead and get started on that. I know from experience that I should not attempt to do eye openings with just an x-acto knife. I know this. I was telling myself not to do that even as I was doing it. But I couldn't stop myself. I kept thinking "it'll be so much quicker and I'll just do it until I get to my guidelines (which I had to re-draw) and then I'll switch to sanding". Well, I reached my guidelines and the eyes weren't quite even so I figured it wouldn't hurt to just use the knife a little more to even them out. Then I could sand.


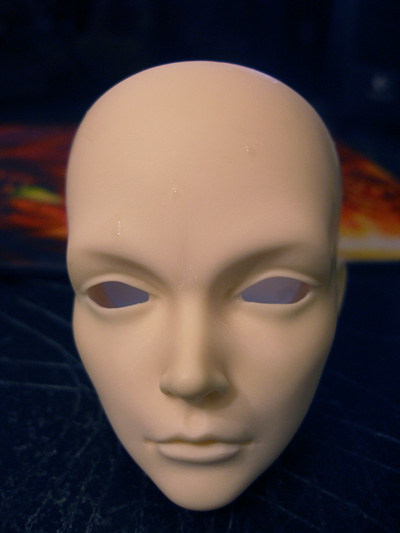
This is what I ended up with. On the one hand, I did manage to open the eyes. On the other hand... the right eye is an abomination. The left it actually just about what I want so at least there is that. I will go in with the epoxy and try to fix the right eye and then attempt to carve in some eyelids. After that, a lot will depend on if I can get the face up right.

Another problem with the right eye is that due to the poor angling of the dremel, eyes don't sit quite right in the socket. Some more work will probably have to be done to remedy that. They do work well in the left though! How I wish Orkas was a pirate right about now so I could give him an eye patch and be done with it!

Thursday, June 19, 2014

eye mods

So, I think I mentioned last time that I was getting an Elfdoll Vivien head to attempt to replace Orkas' current head because it just wasn't quite doing it for me.

It arrived today and it's a sleeping one because I pretty much was willing to take whatever I could get my hands on. I guess if I was more patient I could wait until everyone gets theirs from the discontinuation sale and see if anyone is selling them but then that's kind of a crap shoot because if I don't get in on it then I could be out of luck.

I read somewhere ages ago that the eyewells weren't fully formed on the reminisce heads but I didn't know how to properly phrase the question to the seller and the pictures they provided made it look like the eyewells were properly existent. (Just so we're clear, they didn't try to mislead me at all. They were very helpful and took pictures for me and answered all my questions. I just didn't fully specify my intent when asking about the eyewells.)

So anyway, the head arrived and it does have some degree of eyewells but they don't reach all the way to the eyes, making it impossible to just perform a normal eye opening mod. I will have to bevel or carve the area to make them suitable for eyes.

I seriously considered just leaving it as-is and trying to get an open eyed version of the head as well and just using both and having this one be sleepy Orkas? Of course this seemed like a large financial investment for a head I'm not 100% sure will even work for Orkas. I WANT it to work for him. And if I could be guaranteed that it would I might go that route but I would probably just prefer one head over the other or get them both bodies. It would be dumb and expensive.

As you can see in the above picture, I decided against this plan. I started by marking the general shape I wanted, then I used a bead reamer to make a hold in the eye above the lower lid (because I want to leave that alone) and then I used some wood carving tools to start carving the area a bit.

I got both eyes carved in a little bit. I didn't go all the way up to my guidelines because my plan is to carve proper eyewells before I do that. I think the area in front is carved deep enough that I'll be able to tell when the eyewells are deep enough and be able to continue on my way. I misplaced the eye beveling tool I got ages ago when attempting to sculpt a head from scratch so I had to purchase a new one. Luckily I was able to find a dremel bit in what I think should be the right size for like a buck. Now to not-so-patiently await its arrival. If, in the interim, I find something else that might work I will not have to feel too guilty since said dremel bit was very cheap.

What I do feel guilty about is ruining a perfectly good sleeping head when they are potentially being discontinued. But I imagine I'll get over it if this works out okay.

Thursday, April 17, 2014

PoM: Deidara, part 2 + arms for Moment

I put my hand over part of Dei's mouth last night and decided the problem was that his smile was too wide on the right side, so I set to work rearranging that some and then set the head aside for the epoxy to cure.

In the mean time, an exciting package arrived !

I've been wanting to do something with my Dollzone Moment for ages now, but he really couldn't do much aside from just stand in place because of how heavy and unwieldy his petal arms were. I put up a wtb thread looking for regular arms for him, hoping to get something that would let me replace the lower half of his arms so that he would have a wider range of positions open to him.

I found someone willing to sell pretty quickly and today the arms arrived.

After a bit of work and some hot glue sueding, he can now stand un-aided and sit down without arm parts sticking out for a mile. I'm not sure yet if I'll hold onto the petal parts I'm not using just on the off chance I want to put them on from time to time or if this new arrangement will be his new permanent state. I'm leaning toward the latter because in his current state he strikes a good balance between fancy parts and functionality (in my opinion).

I'm really not used to dealing with dolls in the 40cm range so when I first opened the arms I was convinced they were far too small for him. They work well though. The color is slightly off but it doesn't bother me. And now I feel like I can design some sort of outfit for him and figure out what I want to do about a face up and other fancy leaf/petal stuff.

I also took a few photos of other dolls who only had temporary pictures up on the page listing all of them. And then I got back to work on Deidara. I re-did his face up and actually painted his scope dealy this time.

Then I spent hours making him a wig even though I realized about five minutes into it that it probably wouldn't work as well as I wanted. It might have worked out okay if I hadn't messed up on the style. I kind of went into auto pilot and started doing it the way I'd done his first wig back when I had no idea what I was doing and didn't realize what I was doing wrong until the very end. Oh well. Learning experience. Next time I want to use different yarn too. I much preferred working with the stuff I used for Auralion's wig and it was a lot faster too.

New mouth pics with (mostly) painted scope. It still needs some small details added but it's functional for now.
There's a picture with the wig I spent far too long working on. It's not awful but it just didn't work out the way I wanted. I might not necessarily go 100% with his canon hair style since his ears are too far back for it to look right I think. We will see how it goes I guess.

Wednesday, April 16, 2014

progression of modification: Deidara

For those who haven't followed me since I used to post these updates on doll projects on LJ, a looong time ago back when I was first getting into bjds, I was really heavy into Naruto and my favorite characters were Sasori and Deidara (I still wear a ring on my left thumb because that's the finger Sasori wore his on).

Anyway, I decided I needed them in doll form. This was something I had to have, and it felt like this oh-so-appropriate combination of their two methods of creating art, what with things being hand sculpted with clay initially and then cast as crazy puppet-esque dealies. (minus the explosions but.. sorry Dei, I'm in Sasori's camp there)

Rambling. Sorry. So I got molds for them and I did all these heavy mods to Sasori's body to make it look right for him and it's still one of the mod projects I'm the most proud of. But as the years have gone by and the direction of my collection has changed, I've been less inclined to do anything with them because their style just no longer appealed to me as much as it once did.

I mentioned last time (I think) that in an effort to reconnect with Dei, I attempted some mods on him that didn't turn out so well. And recently I was inspired to try to fix him up.

We'll start with a couple before pics to show what I was working with. He is a DiL Rydel and I'm fairly certain they were an offshoot of DiM that doesn't exist anymore.

The first is an old picture I took. The face up was still mostly default but I added eyeliner. This was back before we'd actually seen Deidara's left eye, so I was kind of making up stuff and decided to go with some crazy target eyes from Soom for that one. The second picture is from someone's sales thread since I don't have many good pictures.

The first order of business was to reduce the size of the eyes to something more reasonable. I was having trouble getting the other eye to match up properly so I decided to just sculpt his scope right onto his face and be done with it.

I had originally planned to mod the mouth back into a more neutral expression but then I got it in my head that maybe the grin could work after all so I added more epoxy and went in that direction.

 After sanding things (relatively) smooth I decided to coat everything with my airbrush and test out a face up to see how things were coming along. Of course, I found all sorts of little scratches and uneven spots after airbrushing was done. Mostly around the mouth and corners of the scope. The eye was pretty smooth.

I put on Dei's old wig just so the head would be less naked for pictures. From certain angles I like the mouth and from others I don't. Not sure yet what I'll do about that but I'll sleep on it. I didn't bother to paint the scope since this is a trial run anyway and that would have taken a lot more time and energy.  It feels slightly off from the other eye, probably because I sculpted it with his original eye size in mind and didn't take into account where his eye actually would be if it had been modded as well. Silly me. Not sure it bothers me enough to fix and it'll be covered with hair most of the time anyway.

Sunday, April 13, 2014

failure (and fixes)

So I've had this head lying around forever that I've been trying to sell and having no luck with. When I went to bump the thread yesterday the pictures had broken links and I was finally like "screw it. This thing isn't going to sell. I'm just going to turn it into a mod project."

So I marked the thread for graveyarding and grabbed my epoxy and set to work.

Here is the head in its original state for those who are curious:

I was really fond of the sculpting pics of this as it was coming along, but the finished product just didn't do anything for me.

Today I went outside to go sand things smooth and test out a face up and decided I'd go ahead and redo the faces on Andael and potential Kael.

Things started badly when during wiping Andael's face up, his chin spontaneously got this jagged hole in it. I'm guessing there was an air bubble below the surface or something. Anyway, that ruined my plans for doing his face since I then had to break out the epoxy again and fill in the hole in his chin. So he's been sitting around waiting on epoxy to cure ever since.

That left Kael and mod project head.

Here is the head in the early stages of modding last night. I decided to make the eyes smaller and get rid of the smirk since I don't trust my sculpting skills when it comes to pulling off expressions like that.

I don't have any spare WS bodies around at the moment so I went ahead and airbrushed the head a more peachy color. I didn't even get the paint thick enough to fully cover the mods but it still took forever to dry so I started on Kael's head.

As I have mentioned, I'm attempting to use an Arvid head for this project, but it's one of those things where I think I'm trying to force myself to love the head because I have wanted one for so long. In person I feel like he's too smiley and his nose is way too thin. I still feel like he looks fine in other people's photos but he just really doesn't do much for me in person. But I keep trying to make it work. And so I was working on doing his face and I got done with the blushing and was starting to lightly mark where I wanted his eyebrows when I decided I just really hated what I'd done so far and gave up.

So I didn't actually end up accomplishing anything because Andael decided to get injured and I just don't think I care for the Arvid mold in person, and by the time my mod project had dried it was dark out.

Here it is as it looks now. I want to work on the mouth more. It looks a bit odd in photos. I don't really notice it so much in person though. Not sure what else I want to do though. I sanded the cheeks a tiny but but I wasn't sure how far I wanted to go with that. I don't really have a specific idea of what I want to do so I guess it might help to decide on that before I go any further.

Might try and give him a face up just to see if it will work at some point later this evening.

EDIT:  
  After chatting a while with Selly, I decided to get busy on something I've been meaning to do for ages. A long time ago I started a mod project on Deidara's head to make him more smirky and I ended up hating it so I left the head in a drawer and pretty much never wanted to look at it again.

I figured I'd try to fix the damage I'd done, among other things. I used the cheap epoxy because I didn't want to waste a ton of the good stuff in case this turned out horribly (the cheap stuff being the five dollar tubes of plumbing epoxy they sell at hardware stores). After I got about as far as I could with the epoxy, I worked a bit on his mouth (might attempt that smirk thing again) and then set the head aside to let the epoxy finish curing.

I then set about a massive body switching party. I recently got an absurdly good deal on an old style Souldoll double body. The newer version looks arguably fancier but after handling the Zenith body and not liking its posing capabilities, I'm not over eager to try out the newer version since it looks like the engineering is similar.

Anyway, I let the body sit around headless for a few days while I decided who was going to get it. I'd originally intended to give it to Andael but then I ended up deciding to give it to Orkas because with the body he was using, his arms were too long for his clothes.

I liked Orkas on the Souldoll body so I decided to keep that, but then there was the issue of who to give his previous body to (which was a Domuya Perennial body). I initially gave it to Alek because he was using an ancient single-jointed Fantasy Doll body, but the minute I put him on it something felt off. He was too tall and lanky and my first thought was "this body makes him look too elvish."

I really didn't want to put him back on the FDoll body because I made the happy discovery that it works pretty well with my Drazen head (who has never been able to get a body because the head is super small. Pretty sure he'd wear the same size wig as an Unoa but he's supposed to be SD size).

Anyway, so I was trying to figure out who might work for another switch and then it occurred to me that Defliel might work. I was instantly pleased with that combination and it makes his clothes fit much better because he's been wearing clothes for a 70cm doll forever now and the Domuya Perennial body has the longest arms of any 60-65cm doll I've ever handled. So his clothes pretty much fit perfectly now and he looks much more regal, which is more appropriate for his character.

Alek then ended up on Defliel's old body (a Domuya flexi-body I have had for forever now). I initially wasn't keen on the match, but after his putting his clothes on I decided I liked it.

After all of that I feel much better about my accomplishments in the doll area for the day. Tomorrow I will probably attempt to give Andael a face up since his epoxy should have had more than enough time to cure. Might attempt one on Drazen too since he has a body (though if Dei's mods work out well he'll likely lose it again until I can afford another one for him since it was Dei's body originally and the only reason he lost it was because I was really unhappy with his mods).

Saturday, March 29, 2014

modification project: Cailath

Last night I was screwing around and put Auralion's head on Loren's body on a whim. He may not end up getting it back. Aura was kind of on a temp body (which was a modified Angelsdoll v2, and I didn't much care for it before mods and then I kind of botched the mod job and cared for it even less but had ruined the resale value at that point and have been too lazy to try to modify it to the point where it's reasonably decent looking again.)

Anyway, I much preferred the Popodoll 68cm body I stole from Loren. It felt like a more appropriate size, being a little more slender and less muscular.

(Loren's body had been sitting around in black pants for 90 years and had various stains on it so Aura got a bath)

This got me wanting to do more stuff with Aura again and then I was feeling bad that he doesn't really have anyone to hang out with since most of the rest of my dolls are characters from my story and he's from WoW.

So I decided to actually buckle down and try to work on Cailath for more than five minutes at a time.

Brought out the various grits of sandpaper and my pointy sanding tool (and later on I also got out some dremel bits and used them sans dremel)

I took some side by side pics shortly after I began sanding to get a feel for how much further I had to go and how things were coming along.


Ideally, I would have to take in the entire lower face a bit, but that would be a LOT of work and require a lot of additive sculpting to fix so they will probably have to settle for looking like fraternal twins.

Here is another picture after more sanding. It doesn't look that different since the outside kind of washes out the white and also I didn't want to work with really low grit sandpaper and overdo anything. I then took the head inside for some additive work on the lips.

I ran out of time before work so this was as far as I got. I will need to do a bit more sanding on the nose and mouth and possibly the chin. I was going to work on the eyes a bit but the resin there is very thin so I don't think much can be done. I'll just have to try to use creative blushing to give the illusion that that area is similarly shaped. I will probably leave the eyes more open than Aura's because Cailath is less of a snooty prick.


Wednesday, November 21, 2012

mod work

A long time ago, there was a failed attempt to find an alternative to getting two Nabarro Hars to play the parts of Auralion and Cailath, my Rogue and Priest twins from WoW. Given that the head was limited to 50 and finding one, let alone two, was proving to be rather impossible, I got this brilliant idea to acquire two Iplehouse Jessica heads as a substitute.

This was entirely based on one person's awesome pictures of their Iplehouse Jessica boy. And the fact that the nose reminded me of the kinds of noses Nabarro gives their sculpts.

Sadly, in person, these heads just didn't work out that well. I ended up modding one and turning it into my Aleksandr (who has been posted about here before). The other was tied up in a potential trade for months (because I originally intended to sell the spare) but then that fell through and I decided I would just turn the spare into Layne since I waffled on having the first one be him anyway and he and Alek are supposed to look a lot alike.


A few hours later I had something I was relatively pleased with. I started with the same mod I did on Alek, which was reducing the cheeks around the sides of the mouth to reduce the smirky look. ANd then I took in the rest of the cheeks more to define the cheekbones better and I altered the brow bones some and added an indent in the middle to make it appear more frowny. Could've just done that with blushing but I was just kinda in the zone and not thinking.

So anyway.. I decided to go ahead and jump into face ups at this point because I was fairly happy with it.

The result: zombie Orkas. He just didn't want to wear any of the wigs that were more appropriate for Layne and I don't have the right hair for him lying around. I happened to put on Orkas' wig and I felt like it worked the best out of anything I'd tried.

I'll probably keep him as Orkas and just add the scar and stuff. And make him look less like a zombie later. I was never 100% happy with Orkas, because I mainly got the first one because the head was cheap and I really wanted an Orkas. And I had no idea what I was doing at the time.

Right now, since Orkas' old head was Elfdoll Homme skin on a light tan Domuya body, his current incarnation is borrowing the spare spare. Which is an ancient Customhouse body that I modded a bunch. This will have to do until I can afford something that matches.

Wednesday, August 15, 2012

hand mods

This is, so far, an embarrassingly bad mod job. I'm not sure why I'm posting about it aside from the fact that I took pictures throughout the process and feel like it would be a waste to not use them.

If nothing else, this can be a cautionary tale about spontaneously deciding something needs mod work done and not thinking through how you're going to accomplish what you want to do.

This is all started because I have an old FDoll body that has super boring hands. (It also has single joints in all the limbs but that's a mod project for another time) Anyway, I found these old Buddydoll hands that came with a body I bought secondhand. The person had replaced the original hands with Luts Senior Delf hands but sent me the originals as well. These remained wrapped up in my 'head closet' (where all spare heads and doll parts reside).

Today I used the boiling water method to re-position the fingers a bit to give the hands a slightly less boring pose. And I was just going to leave it at that and put them on the body. But as you can see here, they have a very odd attaching system and it gives them almost no range of motion.

So I set about turning this into something like the usual attaching system for hands. I've done this mod before (with much more success) on a Glorydoll body's hands.

Drilled through hand.

Unfortunately, my dremel bit of choice for this sort of mod was destroyed in the process of trying to use it on wooden beads when I was making custom hands for Avelarion. Rather than mark the hands off like a smart person, I just went at it with a different bit and eyeballed it. Horrible, horrible mistake. They look awful. But rather than just scrap the project, I decided it was okay. I could salvage this. And I would just keep on going.

I had intended to leave some resin for an s-hook to latch onto (which is what I did last time I did this mod) but I had messed up so badly with my dremeling that I ended up just having to carve out the whole area. This meant I needed to find a way to put a metal rod of some sort through the hands for an s-hook to attach to.

I can't find my small hand drill, so I tried a couple different things like just holding a small drill bit, hammering a nail through, and using a normal screw. None of these things worked, but a screw with a hook on the end gave me enough gripping power to get it through there.

Hand with hole through the side.

And the last part for today was to use epoxy to fill in the gaps where the old attaching system was. Once that dries I will put wire or a small nail through the hand holes and most likely use some combination of super glue and epoxy to keep them in place.

Not the prettiest solution ever, but most of that will be covered by sleeves. Partly because that's how Alek and/or Layne will be dressed and partly because even if the character in question was a nudist, I would give them gauntlets or something to cover up the hideous monstrosity that is these wrist joints. XD

Now with metal things for s-hooks. These things are so gross looking (and I didn't mean for the hole to go so far up past the wrist joint. this is what I get for trying to drill with a one-speed dremel....) but hopefully they will function and I can keep the wrist area out of sight (and out of mind...)

If they still don't work, I'm cutting off the entire wrist ball and making them work the way Dollmore/Volks/etc. hands work and having the wrist ball as a separate part.

EDIT: The horror story has a happy ending:


 Where before the hand couldn't move back and forth at all, it now has a great range of motion! Statik was holding Aleksandr's arm when I strung the new hand on. I didn't bother to move him for the first photo, but then it looked like he was mimicking Alek's pose so I had him do it again for the second one. XD

Friday, August 3, 2012

mods for Selly

Aeri (Selly's Zaoll Luv) represents an OC of hers from an Avengers fanfic she's writing. Aeri is paired with Loki, so obviously she needed him in doll form as well!

Sadly the custom order for a Loki head was full, so we went off in search of another mold that could probably pull off Loki! When making a mockup for Loki's wig, I tried it on Esky and Selly decided that Angelsdoll's Baku (which is the mold Esky is) worked pretty well for Loki.

So she ordered her own and he arrived a couple days ago.

 Here is the head in its default state, shortly after his arrival.

And here are the markings I made to tell myself where to mod him to make the structure more similar to Loki's in the movie.

I'm not done sanding things smooth yet, but this is how he looks now. I'm waiting on the epoxy to fully cure so that I can smooth everything out and give him a face up.

Realized the edges of the eyes weren't making a smooth enough transition into the rest of the face so I added more epoxy.

Tuesday, July 31, 2012

Esky's new goggles

Before I 're-shelled' Esky, he had goggles. But they didn't fit right on his new head. They were big enough, but the proportions were different and they looked wonky on the new one.

Here is a crappy picture of old Esky with the old goggles, just for reference. (In the middle)

Anyway, I"ve been saving a sheet of plastic for ages to try and make new ones for new Esky, so I cut out a rectangle and wrapped it around his head and drew in the shape I wanted. Then I attached it to spare elastic from a pair of safety goggles. Here is Esky modeling the goggles in their beginning stages.

And here is how they look when they are not on his head.

The airbrush doesn't want to stick to them very well, so I've been doing it in very thin layers and letting each one dry before I do another. This is how the goggles look after four layers. This may be the last one I do, depending on how it turns out when dry.

And the completed goggles on Esky's face. Someday I may go in and add some accent dealies around the edges but for now this will work!